Installation Guides
This document describes how to install the RIC components deployed by scripts and Helm charts under the it/dep repository, including the dependencies and required system resources.
Version history
| Date | Ver. | Author | Comment |
| 2019-11-25 | 0.1.0 | Lusheng Ji | First draft |
Overview
The installation of Amber Near Realtime RAN Intelligent Controller is spread onto two separate Kubernetes clusters. The first cluster is used for deploying the Near Realtime RIC (platform and applications), and the other is for deploying other auxiliary functions. They are referred to as RIC cluster and AUX cluster respectively.
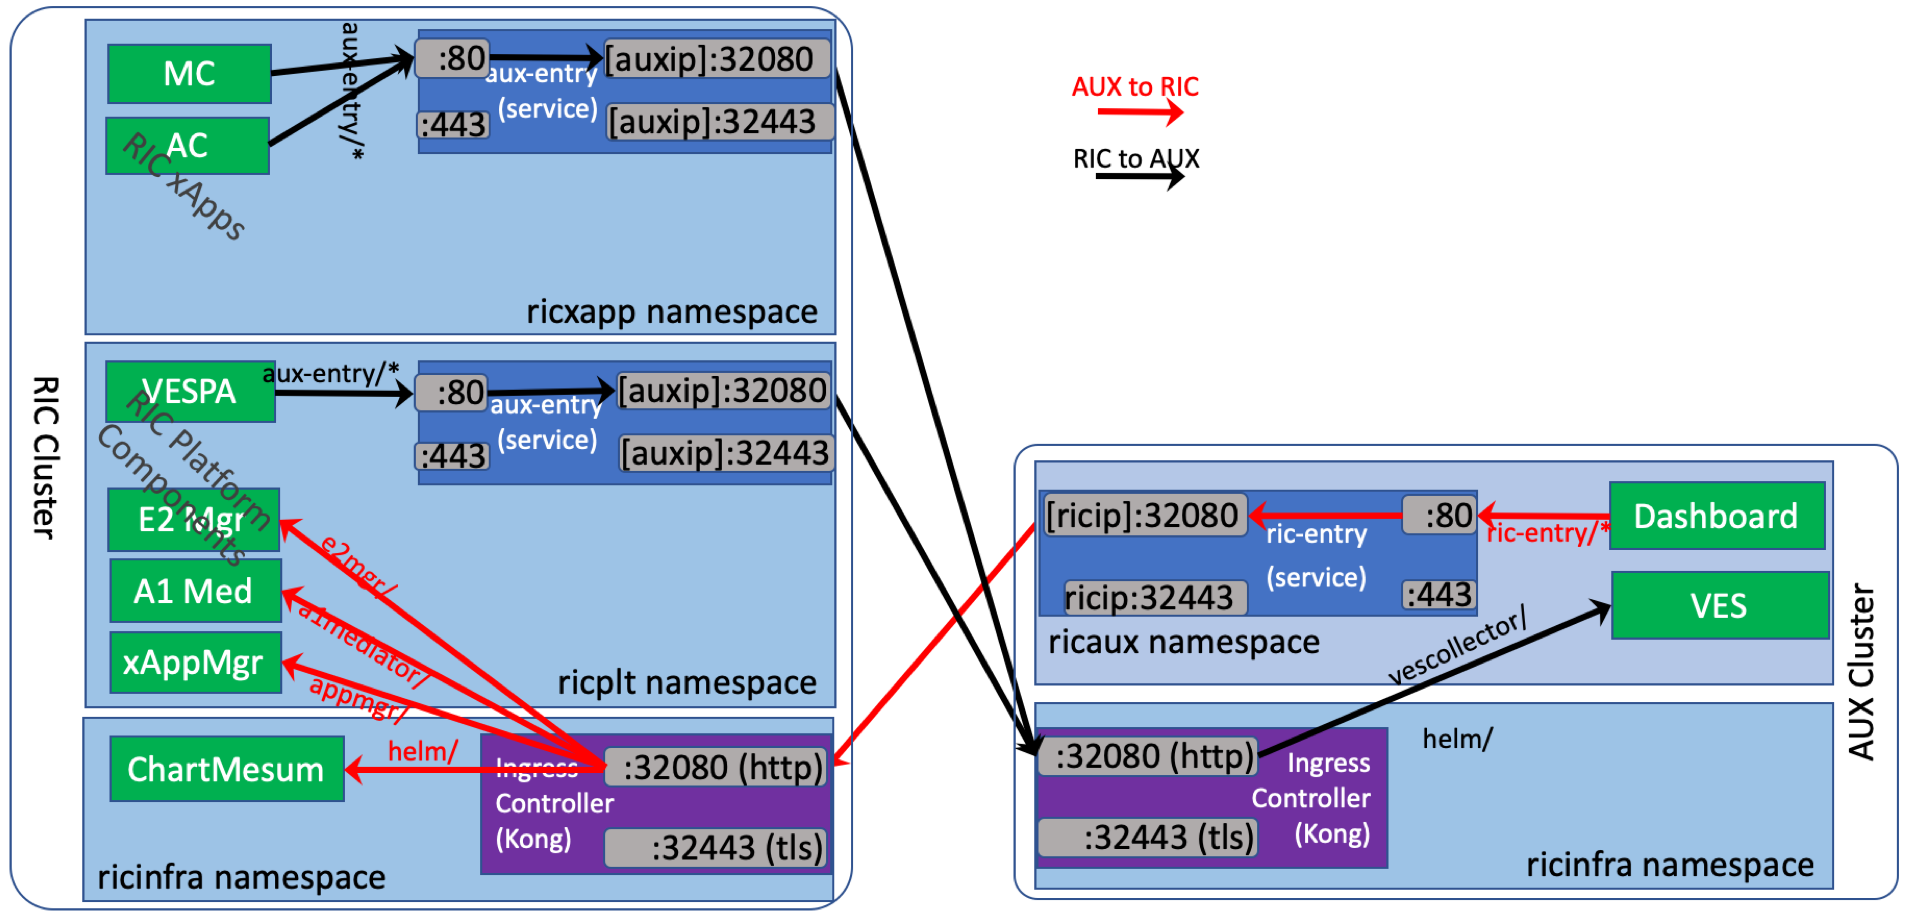
The following diagram depicts the installation architecture.

Within the RIC cluster, Kubernetes resources are deployed using three name spaces: ricinfra, ricplt, and ricxapp. Similarly, within the AUX cluster, Kubernetes resources are deployed using two name spaces: ricinfra, and ricaux.
For each cluster, there is a Kong ingress controller that proxies incoming API calls into the cluster. With Kong, service APIs provided by Kubernetes resources can be accessed at the cluster node IP and port via a URL path. For cross-cluster communication, in addition to Kong, each Kubernetes namespace has a special Kubernetes service defined with an endpoint pointing to the other cluster’s Kong. This way any pod can access services exposed at the other cluster via the internal service hostname and port of this special service. The figure below illustrates the details of how Kong and external services work together to realize cross-cluster communication.
VirtualBox VMs as Installation Hosts
The deployment of Amber Near Realtime RIC can be done on a wide range of hosts, including bare metal servers, OpenStack VMs, and VirtualBox VMs. This section provides detailed instructions for setting up Oracle VirtualBox VMs to be used as installation hosts.
Networking
The set up requires two VMs connected by a private network. With VirtualBox, this can be done by going under its “Preferences” menu and setting up a private NAT network.
- Pick “Preferences”, then select the “Network” tab;
- Click on the “+” icon to create a new NAT network. A new entry will appear in the NAT networks list
- Double click on the new network to edit its details; give it a name such as “RICNetwork”
- In the dialog, make sure to check the “Enable Network” box, uncheck the “Supports DHCP” box, and make a note of the “Network CIDR” (for this example, it is 10.0.2.0/24);
- Click on the “Port Forwarding” button then in the table create the following rules:
- “ssh to ric”, TCP, 127.0.0.1, 22222, 10.0.2.100, 22;
- “ssh to aux”, TCP, 127.0.0.1, 22223, 10.0.2.101, 22;
- “entry to ric”, TCP, 127.0.0.1, 22224, 10.0.2.100, 32080;
- “entry to aux”, TCP, 127.0.0.1, 22225, 10.0.2.101, 32080.
- Click “Ok” all the way back to create the network.
Creating VMs
Create a VirtualBox VM:
- “New”, then enter the following in the pop-up: Name it for example myric, of “Linux” type, and at least 6G RAM and 20G disk;
- “Create” to create the VM. It will appear in the list of VMs.
- Highlight the new VM entry, right click on it, select “Settings”.
- Under the “System” tab, then “Processor” tab, make sure to give the VM at least 2 vCPUs.
- Under the “Storage” tab, point the CD to a Ubuntu 18.04 server ISO file;
- Under the “Network” tab, then “Adapter 1” tab, make sure to:
- Check “Enable Network Adapter”;
- Attached to “NAT Network”;
- Select the Network that was created in the previous section: “RICNetwork”.
Repeat the process and create the second VM named myaux.
Booting VM and OS Installation
Follow the OS installation steps to install OS to the VM virtual disk media. During the setup you must configure static IP addresses as discussed next. And make sure to install openssh server.
VM Network Configuration
Depending on the version of the OS, the networking may be configured during the OS installation or after. The network interface is configured with a static IP address:
- IP Address: 10.0.2.100 for myric or 10.0.2.101 for myaux;
- Subnet 10.0.2.0/24, or network mask 255.255.255.0
- Default gateway: 10.0.2.1
- Name server: 8.8.8.8; if access to that is is blocked, configure a local DNS server
Accessing the VMs
Because of the port forwarding configurations, the VMs are accessible from the VirtualBox host via ssh.
- To access myric: ssh {{USERNAME}}@127.0.0.1 -p 22222
- To access myaux: ssh {{USERNAME}}@127.0.0.1 -p 22223
One-Node Kubernetes Cluster
This section describes how to set up a one-node Kubernetes cluster onto a VM installation host.
Script for Setting Up 1-Node Kubernetes Cluster
The it/dep repo can be used for generating a simple script that can help setting up a one-node Kubernetes cluster for dev and testing purposes. Related files are under the ric-infra/00-Kubernetes directory. Clone the it/dep git repository on the target VM.
% git clone https://gerrit.o-ran-sc.org/r/it/dep
Configurations
The generation of the script reads in the parameters from the following files:
- etc/env.rc: Normally no change needed for this file. If where the Kubernetes cluster runs has special requirements, such as running private Docker registry with self-signed certificates, or hostnames that can be only resolved via private /etc/hosts entries, such parameters are entered into this file.
- etc/infra.rc: This file specifies the docker host, Kubernetes, and Kubernetes CNI versions. If a version is left empty, the installation will use the default version that the OS package management software would install.
- etc/openstack.rc: If the Kubernetes cluster is deployed on Open Stack VMs, this file specifies parameters for accessing the APIs of the Open Stack installation. This is not supported in Amber release yet.
Generating Set-up Script
After the configurations are updated, the following steps will create a script file that can be used for setting up a one-node Kubernetes cluster. You must run this command on a Linux machine with the ‘envsubst’ command installed.
% cd bin
% ./gen-cloud-init.sh
A file named k8s-1node-cloud-init.sh would now appear under the bin directory.
Setting up Kubernetes Cluster
The new k8s-1node-cloud-init.sh file is now ready for setting up the Kubernetes cluster.
It can be run from a root shell of an existing Ubuntu 16.04 or 18.04 VM. Running this script will replace any existing installation of Docker host, Kubernetes, and Helm on the VM. The script will reboot the machine upon successful completion. Run the script like this:
% sudo -i
# ./k8s-1node-cloud-init.sh
This script can also be used as the user-data (a.k.a. cloud-init script) supplied to Open Stack when launching a new Ubuntu 16.04 or 18.04 VM.
Upon successful execution of the script and reboot of the machine, when queried in a root shell with the kubectl command the VM should display information similar to below:
# kubectl get pods --all-namespaces
NAMESPACE     NAME                                   READY   STATUS       RESTARTS  AGE
kube-system   coredns-5644d7b6d9-4gjp5               1/1     Running      0         103m
kube-system   coredns-5644d7b6d9-pvsj8               1/1     Running      0         103m
kube-system   etcd-ljitest                           1/1     Running      0         102m
kube-system   kube-apiserver-ljitest                 1/1     Running      0         103m
kube-system   kube-controller-manager-ljitest        1/1     Running      0         102m
kube-system   kube-flannel-ds-amd64-nvjmq            1/1     Running      0         103m
kube-system   kube-proxy-867v5                       1/1     Running      0         103m
kube-system   kube-scheduler-ljitest                 1/1     Running      0         102m
kube-system   tiller-deploy-68bf6dff8f-6pwvc         1/1     Running      0         102m
Installing Near Realtime RIC in RIC Cluster
After the Kubernetes cluster is installed, the next step is to install the (Near Realtime) RIC Platform.
Getting and Preparing Deployment Scripts
Clone the it/dep git repository that has deployment scripts and support files on the target VM. (You might have already done this in a previous step.)
% git clone https://gerrit.o-ran-sc.org/r/it/dep
Check out the appropriate branch of the repository with the release you want to deploy. For example:
% git checkout Amber
In the RECIPE_EXAMPLE directory, edit the recipe files RIC_INFRA_RECIPE_EXAMPLE and RIC_PLATFORM_RECIPE_EXAMPLE. In particular the following values often need adaptation to local deployments:
- Docker registry URL (property “repository”). This is the default source for container images. For example, nexus3.o-ran-sc.org:10004/o-ran-sc is the staging registry and has freshly built images; nexus3.o-ran-sc.org:10002/o-ran-sc is the release registry and has stable images.
- Docker registry credential. This is a name of a Kubernetes credential. Some registries allow anonymous read access, including nexus3.o-ran-sc.org.
- Helm repo and credential. The xApp Manager deploys xApps from charts in this repo. No changes are required here for basic dev testing of platform components.
- Component docker container image repository override and tag. The recipes specify the docker image to use in terms of name and tag. These entries also allow override of the default docker registry URL (see above); for example, the default might be the releases registry and then a component under test is deployed from the staging registry.
Deploying the Infrastructure and Platform Groups
After the recipes are edited, the Near Realtime RIC is ready to be deployed. Perform the following steps in a root shell.
% sudo -i
# cd dep/bin
# ./deploy-ric-infra ../RECIPE_EXAMPLE/RIC_INFRA_RECIPE_EXAMPLE
# ./deploy-ric-platform ../RECIPE_EXAMPLE/RIC_PLATFORM_RECIPE_EXAMPLE
Checking the Deployment Status
Now check the deployment status after a short wait. Results similar to the output shown below indicate a complete and successful deployment. Check the STATUS column from both kubectl outputs to ensure that all are either “Completed” or “Running”, and that none are “Error” or “ImagePullBackOff”.
# helm list
NAME                   REVISION UPDATED                   STATUS      CHART                   APP VERSION     NAMESPACE
r1-a1mediator          1        Tue Nov 26 00:47:12 2019  DEPLOYED    a1mediator-2.0.0        1.0         ricplt
r1-appmgr              1        Tue Nov 26 00:47:09 2019  DEPLOYED    appmgr-1.1.0            1.0             ricplt
r1-chartmuseum         1        Tue Nov 26 03:16:42 2019  DEPLOYED    chartmuseum-0.0.1   0.1         ricinfra
r1-dbaas1              1        Tue Nov 26 00:47:10 2019  DEPLOYED    dbaas1-1.1.0            1.0             ricplt
r1-e2mgr               1        Tue Nov 26 00:47:10 2019  DEPLOYED    e2mgr-1.1.0             1.0             ricplt
r1-e2term              1        Tue Nov 26 00:47:11 2019  DEPLOYED    e2term-1.1.0            1.0             ricplt
r1-extsvcplt           1        Tue Nov 26 00:47:17 2019  DEPLOYED    extsvcplt-0.2.0         1.0             ricplt
r1-jaegeradapter       1        Tue Nov 26 00:47:16 2019  DEPLOYED    jaegeradapter-0.1.0     1.0             ricplt
r1-kong                1        Tue Nov 26 00:45:36 2019  DEPLOYED    kong-1.0.0              1.0             ricinfra
r1-ricaux-credential   1        Tue Nov 26 00:45:42 2019  DEPLOYED    credential-1.1.0        1.0             ricaux
r1-ricinfra-credential 1        Tue Nov 26 00:45:43 2019  DEPLOYED    credential-1.1.0        1.0             ricinfra
r1-ricplt-credential   1        Tue Nov 26 00:45:42 2019  DEPLOYED    credential-1.1.0        1.0             ricplt
r1-ricxapp-credential  1        Tue Nov 26 00:45:42 2019  DEPLOYED    credential-1.1.0        1.0             ricxapp
r1-rsm                 1        Tue Nov 26 00:47:15 2019  DEPLOYED    rsm-2.0.6               1.0             ricplt
r1-rtmgr               1        Tue Nov 26 00:47:09 2019  DEPLOYED    rtmgr-1.1.0             1.0             ricplt
r1-submgr              1        Tue Nov 26 00:47:13 2019  DEPLOYED    submgr-1.1.0            1.0             ricplt
r1-vespamgr            1        Tue Nov 26 00:47:14 2019  DEPLOYED    vespamgr-0.0.1          1.0             ricplt
r1-xapp-tiller         1        Tue Nov 26 00:45:44 2019  DEPLOYED    xapp-tiller-0.1.0       1.0             ricinfra

# kubectl get pods -n ricinfra
NAME                                              READY   STATUS     RESTARTS   AGE
deployment-ricinfra-chartmuseum-7d97f4b995-gkxsq  1/1     Running    0          133m
deployment-tiller-ricxapp-65f9cbc8d7-qcr5t        1/1     Running    0          133m
job-ricinfra-chartmuseum-save-certs-5ntnk         0/1     Completed  0          133m
r1-kong-kong-84695ff65d-9sjwg                     2/2     Running    2          133m
tiller-secret-generator-w6bnd                     0/1     Completed  0          133m

# kubectl get pods -n ricplt
NAME                                              READY   STATUS     RESTARTS   AGE
deployment-ricplt-a1mediator-5c4df477f9-6zxxx     1/1     Running    0          132m
deployment-ricplt-appmgr-65bc8b958c-tggg7         1/1     Running    0          132m
deployment-ricplt-dbaas-74bf584449-k484v          1/1     Running    0          132m
deployment-ricplt-e2mgr-74cd9865bc-hpn6b          1/1     Running    0          132m
deployment-ricplt-e2term-cc7b5d99-pkctr           1/1     Running    0          132m
deployment-ricplt-jaegeradapter-cc49c64dc-vj622   1/1     Running    0          131m
deployment-ricplt-rsm-599cd4d6c8-4jhft            1/1     Running    0          131m
deployment-ricplt-rtmgr-85d89868d6-58wvl          1/1     Running    1          132m
deployment-ricplt-submgr-7cbd697c7f-p9x4x         1/1     Running    0          132m
deployment-ricplt-vespamgr-7bb4c7585f-9z6qm       1/1     Running    0          132m
Checking Container Health
Check the health of the application manager platform component by querying it via the ingress controller using the following command.
% curl -v http://localhost:32080/appmgr/ric/v1/health/ready
The output should look as follows.
*   Trying 10.0.2.100...
* TCP_NODELAY set
* Connected to 10.0.2.100 (10.0.2.100) port 32080 (#0)
> GET /appmgr/ric/v1/health/ready HTTP/1.1
> Host: 10.0.2.100:32080
> User-Agent: curl/7.58.0
> Accept: */*
>
< HTTP/1.1 200 OK
< Content-Type: application/json
< Content-Length: 0
< Connection: keep-alive
< Date: Wed, 22 Jan 2020 20:55:39 GMT
< X-Kong-Upstream-Latency: 0
< X-Kong-Proxy-Latency: 2
< Via: kong/1.3.1
<
* Connection #0 to host 10.0.2.100 left intact
Undeploying the Infrastructure and Platform Groups
To undeploy all the containers, perform the following steps in a root shell within the it-dep repository.
# cd bin
# ./undeploy-ric-platform
# ./undeploy-ric-infra
Results similar to below indicate a complete and successful cleanup.
# ./undeploy-ric-platform
Undeploying RIC platform components [appmgr rtmgr dbaas1 e2mgr e2term a1mediator submgr vespamgr rsm jaegeradapter]
release "r1-appmgr" deleted
release "r1-rtmgr" deleted
release "r1-dbaas1" deleted
release "r1-e2mgr" deleted
release "r1-e2term" deleted
release "r1-a1mediator" deleted
release "r1-submgr" deleted
release "r1-vespamgr" deleted
release "r1-rsm" deleted
release "r1-jaegeradapter" deleted
Undeploying RIC platform components [extsvcplt]
release "r1-extsvcplt" deleted

# ./undeploy-ric-infra
Please reset your kubernetes cluster manually.
Undeploying RIC infra components [chartmuseum]
release "r1-chartmuseum" deleted
Undeploying RIC infra components [elfkp]
Undeploying RIC infra components [kong]
release "r1-kong" deleted
Undeploying RIC infra components [credential]
release "r1-ricaux-credential" deleted
release "r1-ricinfra-credential" deleted
release "r1-ricplt-credential" deleted
release "r1-ricxapp-credential" deleted
Undeploying RIC infra components [xapp-tiller]
release "r1-xapp-tiller" deleted
Restarting the VM
After a reboot of the VM, and a suitable delay for initialization, all the containers should be running again as shown above.
Installing Auxiliary Functions in AUX Cluster
Resource Requirements
To run the RIC-AUX cluster in a dev testing setting, the minimum requirement for resources is a VM with 4 vCPUs, 16G RAM and at least 40G of disk space.
Getting and Preparing Deployment Scripts
Run the following commands in a root shell:
git clone http://gerrit.o-ran-sc.org/r/it/dep
cd RECIPE_EXAMPLE
Edit the recipe files RIC_INFRA_RECIPE_EXAMPLE and RIC_PLATFORM_RECIPE_EXAMPLE. In particular the following values often need adaptation to local deployments:
- Docker registry URL
- Docker registry credential
- Helm repo credential
- Component docker container image tags.
Deploying the Aux Group
After the recipes are edited, the AUX group is ready to be deployed.
cd dep/bin
./deploy-ric-infra ../RECIPE_EXAMPLE/RIC_INFRA_AUX_RECIPE_EXAMPLE
./deploy-ric-aux ../RECIPE_EXAMPLE/RIC_INFRA_RECIPE_EXAMPLE
Checking the Deployment Status
Now check the deployment status and results similar to the below indicate a complete and successful deployment.
TBD
Installing RIC Applications
Loading xApp Helm Charts
The RIC Platform App Manager deploys RIC applications (a.k.a. xApps) using Helm charts stored in a private Helm repo. In the dev testing deployment described in this documentation, this private Helm repo is the Chart Museum pod that is deployed within the ric infrastructure group into the RIC cluster.
The Helm repo location and credential for access the repo are specified in both the infrastructure and platform recipe files.
Before any xApp can be deployed, its Helm chart must be loaded into this private Helm repo before the App manager can deploy them. The example below show a command sequence that completes:
- Add the Helm repo at the Helm client running on the RIC cluster host VM (via Kong Ingress Controller);
- Load the xApp Helm chart into the Helm repo;
- Update the local cache for the Helm repo and check the Helm chart is loaded;
- Calling App Manager to deploy the xApp;
- Calling App Manager to delete the xApp;
- Delete the xApp helm chart from the private Helm repo.
# add the Chart Museum as repo cm
helm repo add cm http://10.0.2.100:32080/helm

# load admin-xapp Helm chart to the Chart Museum
curl -L -u helm:helm --data-binary "@admin-xapp-1.0.7.tgz" \
   http://10.0.2.100:32080/helm/api/charts

# check the local cache of repo cm
helm repo update cm
# verify that the Helm chart is loaded and accessible
helm search cm/
# the new admin-app chart should show up here.

# test App Manager health check API
curl -v http://10.0.2.100:32080/appmgr/ric/v1/health/ready
# expecting a 200 response

# list deployed xApps
curl http://10.0.2.100:32080/appmgr/ric/v1/xapps
# expecting a []

# deploy xApp
curl -X POST http://10.0.2.100:32080/appmgr/ric/v1/xapps -d '{"name": "admin-xapp"}'
# expecting: {"name":"admin-app","status":"deployed","version":"1.0","instances":null}

# check again deployed xApp
curl http://10.0.2.10:32080/appmgr/ric/v1/xapps
# expecting a JSON array with an entry for admin-app

# check pods using kubectl
kubectl get pods --all-namespaces
# expecting the admin-xapp pod showing up

# underlay the xapp
curl -X DELETE http://10.0.2.100:32080/appmgr/ric/v1/xapps/admin-xapp

# check pods using kubectl
kubectl get pods --all-namespaces
# expecting the admin-xapp pod gone or shown as terminating

# to delete a chart
curl -L -X DELETE -u helm:helm http://10.0.2.100:32080/api/charts/admin-xapp/0.0.5
For more xApp deployment and usage examples, please see the documentation for the it/test repository.