User Guide
This is the user guide for L release of O-DU/l2. Follow installation-guide to get all the dependencies ready.
A. Execution:
I. Execution - On locally compiling O-DU High Source Code
Assign virtual IP addresses as follows:
ifconfig <interface name>:ODU “192.168.130.81”
ifconfig <interface name>:CU_STUB “192.168.130.82”
ifconfig <interface name>:RIC_STUB “192.168.130.80”
- PS: If O1 interface is enabled, IPs should match those configured in “startup_config.xml”
( Refer Installation Guide - “Setting up Netconf server” )
Execute CU Stub:
Navigate to CU execution folder
cd <O-DU High Directory>/l2/bin/cu_stub
Run CU Stub binary
./cu_stub
Execute RIC Stub:
Navigate to RIC execution folder
cd <O-DU High Directory>/l2/bin/ric_stub
Run RIC Stub binary
./ric_stub
Execute O-DU High:
Navigate to ODU execution folder
cd <O-DU High Directory>/l2/bin/odu
Run ODU binary
./odu
- PS: CU stub and RIC stub must be run (in no particular sequence) before ODU.
In case O1 is enabled and SMO is not available run section D to start the stack.
II. Execution - Using Docker Images
The call flow between O-DU High and CU Stub can be achieved by executing docker containers.
- Pull the last built docker images:
docker pull nexus3.o-ran-sc.org:10004/o-ran-sc/o-du-l2:12.0.1
docker pull nexus3.o-ran-sc.org:10004/o-ran-sc/o-du-l2-cu-stub:
- Run CU Stub docker:
docker run -it –privileged –net=host –entrypoint bash nexus3.o-ran-sc.org:10004/o-ran-sc/o-du-l2-cu-stub:12.0.1
./cu_stub
- Run ODU docker:
docker run -it –privileged –net=host –entrypoint bash nexus3.o-ran-sc.org:10004/o-ran-sc/o-du-l2:12.0.1
./odu
B. Pairwise testing with Intel O-DU Low:
This section describes the changes required in compilation and execution of O-DU High binaries to successfully integrate with Intel O-DU Low in radio mode.
I. Pre-requisites
Install O-DU High as per installation-guide .
Clone O-DU Low code in <O-DU Low Directory> from
Install O-DU Low as per https://docs.o-ran-sc.org/projects/o-ran-sc-o-du-phy/en/latest/index.html .
II. Compilation
Build ODU :
Create folder <O-DU High Directory>/l2/src/wls_lib. Copy wls_lib.h from <O-DU Low Directory>/phy/wls_lib/ to <O-DU High Directory>/l2/src/wls_lib.
Create folder <O-DU High Directory>/l2/src/dpdk_lib. Copy following files from <O-DU Low Directory>/dpdk-19.11/x86_64-native-linuxapp-gcc/include/ to <O-DU High Directory>/l2/src/dpdk_lib.
rte_branch_prediction.h
rte_common.h
rte_config.h
rte_dev.h
rte_log.h
rte_pci_dev_feature_defs.h
rte_bus.h
rte_compat.h
rte_debug.h
rte_eal.h
rte_os.h
rte_per_lcore.h
Navigate to build folder
cd <O-DU High Directory>/l2/build/odu
Build ODU Binary:
make odu PHY=INTEL_L1 MACHINE=BIT64 MODE=FDD
III. Execution
Execute O-DU Low:
Setup environment:
cd <O-DU Low Directory>/phy/
source ./setupenv.sh
Run O-DU Low binary :
cd <O-DU Low Directory>/FlexRAN/l1/bin/nr5g/gnb/l1
To run in radio mode : ./l1.sh -xran
L1 is up when following prints are seen on console:
Non BBU threads in application==================================================================nr5g_gnb_phy2mac_api_proc_stats_thread: [PID: 8659] binding on [CPU 0] [PRIO: 0] [POLICY: 1]wls_rx_handler (non-rt): [PID: 8663] binding on [CPU 0]==================================================================PHY>welcome to application console
Execute FAPI Translator:
Setup environment:
cd <O-DU Low Directory>/phy/
source ./setupenv.sh
Run FAPI translator binary:
cd <O-DU Low Directory>/phy/fapi_5g/bin/
./oran_5g_fapi –cfg=oran_5g_fapi.cfg
Execute CU Stub and RIC Stub:
Run steps in sections A.I.1 through A.I.3 .
Execute DU:
DU execution folder
cd <O-DU High Directory>/l2/bin/odu
Export WLS library path
export LD_LIBRARY_PATH=<O-DU Low Directory>/phy/wls_lib/lib:$LD_LIBRARY_PATH
Run ODU binary
./odu
C. Message Flow:
O-DU High opens WLS interface during bring up. Message exchanges can begin once the interface is ready. Following diagram shows P5 messages exchanged with O-DU Low in timer mode.
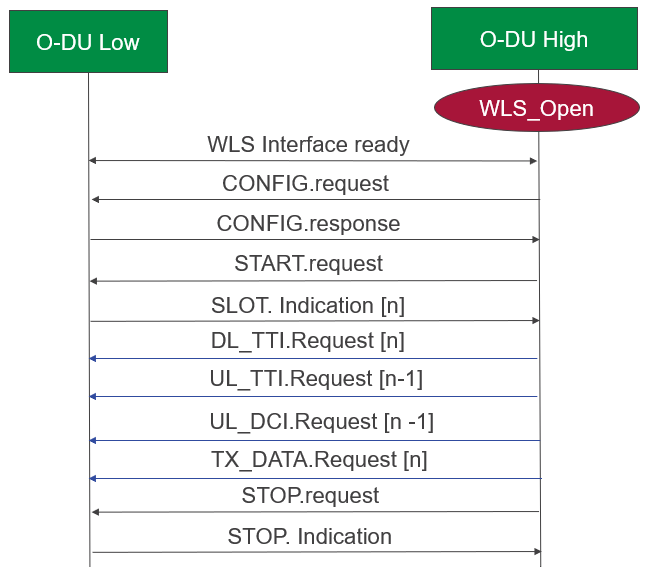
Figure 28 - O-DU High - O-DU Low Message Flow Diagram
Note: UL IQ-Sample request and response are needed by Intel O-DU Low in timer mode(testing mode) only. Code changes for these are guarded under INTEL_TIMER_MODE flag which can be enabled using compilation option “PHY_MODE=TIMER”, as mentioned in section B.I.1.d .
D. Push cell and slice configuration over O1 using netopeer-cli
When O-DU High is run with O1 enabled it waits for initial cell configuration to be pushed by SMO before starting the stack. In case the SMO is not available then these configurations can be pushed via netopeer-cli as follows:
$cd l2/build/config$netopeer2-cli> connect –login netconfInteractive SSH AuthenticationType your password:Password: netconf!> edit-config –target candidate –config=cellConfig.xml> OK> commit> OK> edit-config –target candidate –config=rrmPolicy.xml> OK> commit> OKFor pushing these configurations in subsequent runs please edit cellConfig.xml and rrmPolicy.xml and increment number in the <id> tag to a new value e.g.
<id>rrm-2</id
E. How to execute the Health Check using netopeer-cli : get alarm-list
In case the SMO is not available the alarm list can be checked using netopeer-cli as follows:
netopeer2-cli> connect –login netconfInteractive SSH AuthenticationType your password:Password: netconf!> get –filter-xpath /o-ran-sc-odu-alarm-v1:odu/alarmsDATA<odu xmlns="urn:o-ran:odu:alarm:1.0"><alarms><alarm><alarm-id>1009</alarm-id><alarm-text>cell id [1] is up</alarm-text><severity>2</severity><status>Active</status><additional-info>cell UP</additional-info></alarm></alarms></odu>
The XML output is a list of active alarms in the O-DU High system.
F. Running the DU, CU Stub and RIC Stub in containerization mode
Pre-requisite for Running in Containerization Mode
Install Docker
Set Up Kubernetes Cluster Using Minikube and Use Docker as the Driver
- Steps to Run the DU, CU Stub, and RIC Stub in Containerization Mode
- Clone and compile the Code
- Create a directory:
mkdir ODU_CONTAINER
- Navigate to the directory:
cd ODU_CONTAINER
- Clone the repository:
git clone “https://gerrit.o-ran-sc.org/r/o-du/l2”
Compilation steps are mentioned in section d.
- Set Docker Environment
- Set up Docker environment for Minikube:
eval $(minikube docker-env)
- Generate Docker Images
- Navigate to the l2 directory:
cd l2
- Build the Docker images:
docker build -f Dockerfile.cu -t new-cu-container:v1 .
docker build -f Dockerfile.ric -t new-ric-container:v1 .
docker build -f Dockerfile.du -t new-du-container:v1 .
- Check Docker Images
- Run the following command to check if the Docker images are created:
docker images
- Deploy with Helm
- Go to the container/cu_helm directory and deploy the ocu chart:
cd container/cu_helm
helm install ocu cu
- Go to the du_helm directory and deploy the odu chart:
cd ../du_helm
helm install odu du
- Go to the ric_helm directory and deploy the ric chart:
cd ../ric_helm
helm install ric ric
- Get Pod, Deployment, and Service Info
- Run the following command to get information about the pod, deployment, and service:
kubectl get all
- Run the Pods in Separate Terminals
- Terminal 1 (CU Pod):
kubectl exec -it <CU_POD_NAME> – bash
./cu-docker-entrypoint.sh
cd /root/l2/build/odu/bin
./cu_stub/cu_stub
- Terminal 2 (RIC Pod):
kubectl exec -it <RIC_POD_NAME> – bash
./ric-docker-entrypoint.sh
cd /root/l2/build/odu/bin
./ric_stub/ric_stub
- Terminal 3 (DU Pod):
kubectl exec -it <DU_POD_NAME> – bash
./docker-entrypoint.sh
cd /root/l2/bin
./odu/odu
G. Steps to run FAPI decoder
- Enable the Platform flag in the main makefile
Location: l2/build/odu/makefile
Add -DFAPI_DECODER to the PLTFRM_FLAGS line. It should look like: PLTFRM_FLAGS = -UMSPD -DODU -DINTEL_FAPI -DODU_MEMORY_DEBUG_LOG -DFAPI_DECODER
- Compile and generate all binaries
- Binaries to compile:
ODU
CU_STUB
RIC_STUB
- Go to the l2/tools/Fapi_Decoder directory and compile the decoder
Run the following command: gcc -o decoder decoder.c
- Execute binaries and capture logs
- Step 1: Open four terminals:
Terminal 1: Execute the RIC binary.
Terminal 2: Execute the CU binary.
Terminal 3: Execute the ODU binary.
Terminal 4: Capture the logs at the decoder and run ./decoder.
Step 2: Execute the RIC and CU binaries in Terminal 1 and Terminal 2.
Step 3: Run the decoder in Terminal 4 using the ./decoder command.
Step 4: Execute the ODU binary in Terminal 3 after completing the previous steps.
H. Steps to run the memory leak tool
- Enable the Platform flag in the main makefile
- Location: l2/build/odu/makefile
- Add -DODU_MEMORY_DEBUG_LOG to the PLTFRM_FLAGS line:
PLTFRM_FLAGS = -UMSPD -DODU -DINTEL_FAPI -DODU_MEMORY_DEBUG_LOG
- Enable the CLA Use-case (Enable the Cell Down scenario)
- A hack to enable the complete scenario from Cell Up to Down so that memory status can be captured:
This ensures that memory allocation and deallocation are tracked throughout the Cell Up and Cell Down process.
The goal is to log memory usage and status for debugging or analysis during the transition from Cell Up to Cell Down.
- Files to change:
- File 1: l2/src/du_app/du_egtp.c
- In the egtpRecvMsg() function:
Disable the infinite while loop in the EGTP receiver thread.
- File 2: l2/src/du_app/du_f1ap_msg_hdl.c
- In the BuildAndSendUeCtxtRsp() function:
Inside the case “UE_CTXT_MOD” action type, add: BuildAndSendDUConfigUpdate(SERV_CELL_TO_DELETE);
- Compile and generate all binaries
- Binaries to compile:
ODU
CU_STUB
RIC_STUB
- Execute binaries and capture logs
Step 1: Execute RIC and CU binaries.
- Step 2: Before running the ODU binary:
Capture logs using the script command.
- Complete CELL Down and stop capturing logs
- Once the CELL Down process completes in the ODU console:
Stop/kill the ODU binary.
Exit log capture.
- Download console logs
Save the logs to your system (e.g., Desktop).
- Analyze ODU console logs
Download TextAnalysisTool.NET.exe
- Open the log in the tool:
File -> Open
- Filter ALLOC and FREE logs:
- Filters -> Add New Filters
Add ALLOC and FREE filters.
View -> Show only Filtered Lines
Copy filtered results to separate Excel sheets.
- Split data into columns in Excel:
- Data -> Text to Columns
Step 1: Choose Delimited
Step 2: Select Tabs, Semicolon, and Comma
Step 3: Click Finish
Copy columns C and D (Size and Address).
- Generate memory logs
Go to l2/tools/Memory_Leak_Detector
- Delete old files:
freeoutput.txt
allocoutput.txt
- Copy data to files:
- Paste columns C and D into:(Refer above 7th point)
alloc.txt
free.txt
- Remove double spaces:
:%s/ / /g (execute twice)
- Compile the program
gcc -o scan.out scan.c
- Execute the program:
./scan.out
- Analyze outputs logs
- freeoutput.txt should be empty.
If there is any address present in freeoutput.txt then check the address and resolve the dangling pointer issue.
- allocoutput.txt may show some initial allocations.
If there is any address present in allocoutput.txt then check the address and free the memory allocation.